
Selecting the right motorcycle phone mount is one of the most practical decisions you can make to improve your riding experience. Whether you are navigating the dense, fast-moving traffic of Metro Manila, cruising along provincial highways, or tackling rugged provincial trails, having clear and safe access to your GPS is essential. However, a mount that works perfectly for a city commuter on a scooter might be completely inadequate for an adventure rider tackling off-road terrain or a sportbike enthusiast on the expressway.
Your choice of mount affects not only how easily you can see your navigation but also the physical safety of your smartphone and your overall riding safety. As you look for essential motorcycle accessories parts to upgrade your setup, understanding how different mounting configurations interact with your specific riding style, your motorcycle’s geometry, and the local road conditions is the key to making a smart investment. By evaluating the mechanical advantages and limitations of each mount type, you can find a solution that keeps your device secure and your focus on the road.
Quick Match: Mount Types vs. Riding Scenarios
To help you quickly identify the best starting point for your search, the table below matches the most common riding styles with their ideal mounting configurations, highlighting the primary benefits and key technical considerations for each.
Products mentioned in this guide
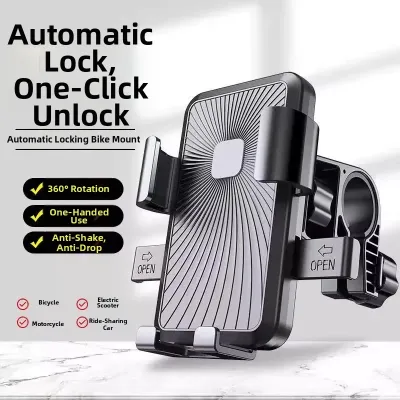
Prices are valid at publication and may change. Please refer to the product page for the latest price.
| Riding Scenario | Recommended Mount Type | Primary Benefit | Key Consideration |
|---|---|---|---|
| Daily City Commuting | Handlebar Mount | Highly adjustable, easy to access, quick phone removal | Requires exposed metal bars; can clutter compact cockpits |
| Long-Distance Touring | Mirror Stem Mount | Positions phone closer to eye level, keeps handlebars clear | Must verify thread direction (standard vs. reverse) |
| Off-Road & Adventure | Steering Stem / Windshield Mount | Centralized alignment, high stability on rough terrain | Requires bike-specific hardware and precise measurements |
While this quick-match guide provides a reliable baseline, the final decision depends heavily on your motorcycle’s cockpit layout and your smartphone’s physical dimensions. A mount that looks perfect on paper might block your instrument cluster or interfere with your control cables if your bike has a unique geometry. In the following sections, we will analyze each mounting type in detail to help you make an informed choice.
Handlebar Mounts: The Standard for Daily City Commuting
Handlebar mounts are the most popular and widely available option on the market today. For daily commuters and professional delivery riders who spend hours navigating urban streets, these mounts serve as the default choice. Their popularity stems from their straightforward mechanical design, ease of installation, and exceptional versatility. Most standard handlebar mounts are designed to clamp directly onto common handlebar diameters, typically 22mm (7/8 inch) or 28mm (1-1/8 inch), making them highly compatible with a wide range of standard motorcycles, naked streetfighters, and underbone bikes.

When riding in stop-and-go city traffic, having a highly adjustable viewing angle is a major advantage. Handlebar mounts usually feature a ball-and-socket joint that allows you to tilt, rotate, and pivot your phone to avoid glare from the intense midday sun. This adjustability ensures that you can position your screen exactly where you need it for quick, glanceable navigation updates while keeping your hands firmly on the grips.
However, urban riding requires careful attention to the physical profile of your mount. In tight city spaces where lane filtering is common, a bulky or poorly positioned mount can become a hazard. It is crucial to choose a low-profile design that keeps the phone tucked close to the center of the handlebars. A mount that protrudes too far outward can strike car side mirrors during tight maneuvers, or worse, restrict your hand movement when turning the handlebars to their limits. Furthermore, you must ensure the mount is positioned so it does not pinch or rub against your front brake lines, clutch cables, or throttle assembly.
For city riders, security when parked is another critical factor. Leaving your phone on your bike—even for a few seconds while paying at a toll booth or picking up a quick order—creates an immediate theft risk. High-quality handlebar mounts designed for city use often feature quick-release mechanisms. These systems allow you to detach the phone, along with its cradle, from the handlebar clamp with a single click or twist, allowing you to carry your device with you effortlessly whenever you step off your motorcycle.
Despite their benefits, handlebar mounts have distinct limitations. On smaller scooters or naked bikes with compact cockpits, handlebar space is highly limited. Mounting a large modern smartphone can quickly clutter your controls, making it difficult to access your ignition switch or key slot. More importantly, a poorly positioned handlebar mount can easily block your view of the instrument cluster, obscuring critical information like your speedometer, fuel gauge, or engine warning lights. Before choosing a handlebar mount, carefully inspect your cockpit to ensure you have enough open bar space to accommodate the clamp without compromising your access to controls or visibility of your gauges.
Mirror Mounts: The Touring Rider's Choice for Clear Visibility
For riders who prefer long-distance touring and highway cruising, mirror stem mounts offer a highly effective alternative to traditional handlebar clamps. When spending long hours on the highway, ergonomics and eye strain become major safety considerations. Looking down at a handlebar-mounted phone requires you to lower your gaze significantly, taking your eyes completely off the road for several seconds. Mirror mounts solve this issue by utilizing the existing mirror mounting points on your control perches, positioning your smartphone much higher and closer to your natural line of sight.
By elevating the phone, a mirror mount allows you to check your GPS navigation using only your peripheral vision, keeping your eyes focused on the road ahead. This elevated position is particularly beneficial when navigating complex highway interchanges or riding at higher speeds, where split-second decisions are critical. Additionally, because the mount attaches to the mirror stem, it leaves your handlebars completely clear, allowing you to mount other essential touring accessories like action cameras, tire pressure monitors, or auxiliary light switches.
Before purchasing a mirror mount, you must carefully verify your motorcycle’s mirror stem specifications. Mirror stems are not universally threaded; while many motorcycles use standard 10mm (M10) right-hand threads, several popular brands use reverse (left-hand) threads on the right-side mirror to prevent wind pressure from loosening the mirror assembly. You must check both the thread size and the rotation direction of your mirror stems. Additionally, inspect the physical clearance between the mirror housing, the mounting base, and your motorcycle’s front fairing or windshield. If the clearance is too tight, the mount may rub against your bodywork, causing cosmetic damage or restricting your steering.
Aerodynamics also play a significant role in long-distance riding comfort. A phone mounted high on a mirror stem is exposed to intense wind resistance, which can cause significant buffeting and vibration at highway speeds. However, on touring bikes equipped with a front fairing or an aftermarket windshield, a mirror mount often allows you to tuck the phone directly behind the wind screen. This positioning shields the device from the direct force of the wind, reducing drag on your motorcycle and protecting your phone from flying debris, insects, and sudden rain showers.
Despite these advantages, mirror mounts have specific trade-offs that you must consider. Because the mount shares space with your rearview mirror, a poorly adjusted phone cradle can partially block your view of the road behind you, creating dangerous blind spots. You must take the time to adjust both the mirror and the phone mount to ensure you maintain a clear, unobstructed rear view. Furthermore, installing a mirror mount is generally more complex than clamping a bracket onto an exposed handlebar. It often requires removing the mirror entirely, applying thread-locking compound, and using wrenches to torque the assembly correctly, making precise installation essential for a secure fit.
Steering Stem and Windshield Mounts: Specialized Options for Adventure and Cruisers
When standard handlebar or mirror mounts fail to fit your motorcycle’s unique design, specialized mounting options like steering stem mounts and windshield brackets provide highly secure, tailored solutions. These options are particularly popular among sportbike riders, adventure touring enthusiasts, and cruiser owners who require maximum stability under demanding riding conditions.
Steering stem mounts are designed specifically for motorcycles with clip-on handlebars, which are common on sportbikes and sport-touring models. These bikes typically lack any exposed round handlebar tubing, making standard clamps unusable. A steering stem mount solves this problem by utilizing the hollow steering stem nut located at the center of the triple tree. The mount features an expanding cylindrical plug—often made of high-strength rubber or split aluminum—that is inserted into the hollow stem. As you tighten the central bolt, the plug expands outward against the inner walls of the stem, creating an incredibly secure, high-friction fit.
This centralized mounting position offers exceptional stability. Because the phone is located at the exact pivot point of your steering system, it experiences significantly less lateral movement and vibration compared to mounts positioned further out on the handlebars or mirrors. This central alignment is highly valued by adventure riders who tackle rough, unpaved roads where extreme chassis vibration can make reading a shaking screen impossible. To install a steering stem mount, you must use a precision caliper to measure the exact inner diameter of your steering stem hole, as these diameters vary widely across different motorcycle manufacturers and models.
Windshield and fairing mounts, on the other hand, attach directly to the structural support brackets of your motorcycle’s windshield or fairing assembly. This configuration is highly common on large adventure touring motorcycles and heavy cruisers. Many adventure bikes feature a dedicated accessory mounting bar (often 12mm in diameter) positioned directly above the main instrument cluster, specifically designed for GPS units and phone mounts. Mounting your phone here integrates it seamlessly into your motorcycle’s existing wind protection, keeping it fully shielded from wind blast and rain.
This high, centralized position offers the absolute best line of sight possible, allowing you to monitor your navigation without ever looking down. However, because these specialized mounting options rely on specific structural points on your motorcycle, they are rarely universal. You must carefully verify your bike’s exact hardware dimensions, bolt patterns, and clearance limits before purchasing. Using a specialized mount often requires buying model-specific adapters or brackets, making it a more expensive but highly rewarding investment for serious riders.
Essential Features to Verify Before Buying
No matter which mounting style you choose, your phone mount must perform two critical tasks: securely holding your expensive device under harsh riding conditions and protecting its delicate internal electronics from damage. To ensure you select a mount that offers genuine protection, you must look past basic marketing claims and verify several key technical specifications.
Vibration Dampening and OIS Protection
Modern smartphones are equipped with highly sophisticated camera systems that feature Optical Image Stabilization (OIS) and closed-loop autofocus. These systems rely on incredibly small, delicate gyroscopes and magnetic coils to physically move the camera lens elements, compensating for hand movement to prevent blurry photos. While highly effective for daily use, these delicate internal components are extremely vulnerable to the high-frequency, high-amplitude vibrations produced by motorcycle engines.
When a motorcycle engine operates at high RPMs, it transmits intense, rapid vibrations through the frame, handlebars, and mirror stems. Without protection, these continuous high-frequency vibrations will rapidly fatigue and permanently damage your phone’s OIS mechanism, resulting in a camera that can no longer focus. To prevent this costly damage, you should prioritize phone mounts that feature a dedicated, integrated vibration dampener module.
These modules typically consist of a split housing separated by soft, high-grade silicone or rubber elastomer isolators. The elastomers act as a physical filter, absorbing the high-frequency engine vibrations and converting them into harmless, low-frequency movement. When evaluating a mount, look for manufacturers that provide clear technical specifications regarding their dampener’s tested frequency range and weight limits, rather than relying on generic “shockproof” labels. Investing in a high-quality, proven vibration dampener is essential to preserving your smartphone’s camera functionality.
Grip Security and Weather Resistance
Evaluating how a mount physically holds your phone is crucial for preventing catastrophic device loss on the road. Phone mounts generally utilize one of three retention mechanisms: spring-loaded clamps, screw-tightened mechanical jaws, or magnetic locking systems. While spring-loaded clamps offer quick convenience, they can lose tension over time as the internal springs fatigue. For high-speed highway riding or bumpy provincial roads, mechanical locking systems that screw or snap shut offer significantly higher security.
For the ultimate peace of mind, choose a mount that combines a primary mechanical lock with a secondary safety tether, such as a heavy-duty silicone band that stretches over the corners of your phone. This dual-layer protection ensures that even if a primary clamp is accidentally bumped open, the phone remains securely attached to the mount. Magnetic mounting systems can be highly secure, but they must use industrial-strength, rare-earth magnets and should always be paired with a mechanical physical lock for motorcycle applications.
Additionally, your mount must be built to withstand the challenging tropical climate of the Philippines. Intense daily exposure to ultraviolet (UV) radiation can rapidly degrade cheap plastics, causing them to become brittle, discolor, and crack under stress. Ensure the mount is constructed from UV-stabilized composite materials, marine-grade stainless steel, or anodized aluminum to prevent structural failure. Rust-proof hardware is equally critical to withstand the high humidity and heavy downpours of the monsoon season.
While weather protection is important, you should actively avoid fully enclosed waterproof pouches. These zippered plastic cases act like miniature greenhouses under the hot tropical sun. Because there is no airflow inside the pouch, the heat generated by your smartphone’s battery and processor has nowhere to escape. This rapidly causes the phone to overheat, throttle its performance, dim its screen, or shut down entirely within minutes of riding. Instead, opt for an open-air mechanical mount and rely on your phone’s built-in water resistance, or carry a temporary, well-ventilated rain cover for heavy downpours.
Safe Installation and Routine Maintenance Checks
Installing a motorcycle phone mount requires careful preparation and attention to detail to ensure both your device and your motorcycle remain safe on the road. Before beginning the installation, always consult your motorcycle’s original owner’s manual and the phone mount manufacturer’s instructions. If you encounter any conflicting guidelines, or if you are unsure about your ability to perform the installation safely, stop and consult a qualified professional motorcycle technician.
Begin your installation by performing a thorough pre-installation check. Use a precision caliper to measure the exact outer diameter of your handlebar or mirror stem to ensure you are using the correct sizing inserts provided with your mount. When clamping the mount onto your handlebars, use a torque wrench to tighten the bolts to the manufacturer’s specified torque limits. Overtightening can strip the threads on aluminum clamps or crush delicate handlebar tubing, while undertightening can cause the mount to spin loose while riding.
Once the mount is physically secured, perform a critical safety check before placing your phone in the cradle. Turn your handlebars fully from lock to lock—all the way to the left and all the way to the right. Verify that the mount, the phone cradle, and your routed charging cables do not strike your fuel tank, pinch any wiring harnesses, or pull on your front brake lines, clutch cables, or throttle assembly. If you plan to run a USB charging cable from your bike’s battery or accessory port, route the cable carefully along the frame, securing it with zip ties. Ensure you leave enough slack near the steering head to accommodate full steering movement without tension, and keep the cable far away from hot engine components and moving suspension parts.
Maintaining your phone mount is just as important as installing it correctly. Over time, continuous road vibrations, heat exposure, and rain can slowly loosen fasteners and degrade materials. Establish a routine maintenance schedule to inspect your mounting hardware regularly:
- After the first 50 kilometers of riding with a new mount, use a hex key or torque wrench to check and re-tighten all mounting bolts, as initial vibrations can cause fasteners to settle.
- During your weekly bike inspection, physically wiggle the mount to check for any play or movement at the mounting base.
- Inspect the silicone or rubber vibration dampeners for any signs of cracking, dry rot, or hardening, and replace them immediately if they show signs of wear.
- Clean the mechanical locking teeth and pivot joints with a mild, non-abrasive soap and water to remove road grime, salt residue, and dust that can interfere with the locking mechanism.
Safety Boundary: If at any point during installation or routine inspection you find that the phone mount restricts your steering movement, pinches your control cables, blocks your view of critical warning lights, or shows signs of structural cracking, you must stop using the mount immediately. Do not ride with a compromised control setup. Seek an alternative mounting location, purchase a different mount type, or consult a professional technician to resolve the issue.
Frequently Asked Questions (FAQ)
Do I really need a vibration dampener for my smartphone?
Yes, if your smartphone features Optical Image Stabilization (OIS), a vibration dampener is highly necessary to prevent permanent damage to your camera. Modern mid-range and flagship smartphones use incredibly delicate physical gyroscopes and electromagnets to stabilize their lenses. The continuous, high-frequency vibrations produced by motorcycle engines—especially single-cylinder engines common in commuter bikes or large-displacement V-twins—will rapidly fatigue and destroy these delicate mechanisms, leading to a permanently blurry camera that cannot focus.
While small-displacement scooters with rubber-mounted engines isolate some vibration, the risk of damage remains present. Investing in a mount with a proven, high-quality silicone elastomer vibration dampener is a fraction of the cost of a smartphone camera repair, making it an essential feature for any modern rider.
How do I prevent my phone from overheating in tropical weather?
To prevent your smartphone from overheating under the intense tropical sun, always choose an open-air mechanical mount rather than a fully enclosed waterproof pouch. Open-air mounts allow oncoming wind to continuously cool the back of your phone, dissipating heat naturally. Additionally, try to position your mount so that it receives direct airflow while remaining partially shaded by your motorcycle’s front fairing, windshield, or your own body.
To reduce internal heat generation, lower your screen brightness slightly, close all unnecessary background applications, and disable power-intensive features like continuous high-resolution video recording or mobile gaming while navigating. If you must charge your phone while riding, use a high-quality, certified charging cable and avoid charging during the hottest hours of the day, as charging generates significant internal battery heat.
Community discussion
Share your experience or ask a question. Comments are reviewed before publication.