
Choosing the right engine air filter and cabin air filter for your Suzuki S-Presso is essential for maintaining engine performance and ensuring clean air inside the cabin. Because this compact hatchback features a highly specific engine bay layout and HVAC housing, buying generic, one-size-fits-all filters can lead to poor sealing, engine wear, or restricted airflow. To get the best results, you must select filters that match the exact dimensions and specifications designated for your S-Presso’s model year.
Small-displacement engines, like the one powering your S-Presso, rely heavily on a precise air-to-fuel ratio to maintain efficiency. A clogged or ill-fitting engine air filter can disrupt this balance, leading to sluggish performance and increased fuel consumption. Similarly, a high-quality cabin filter protects you and your passengers from road dust, pollen, and exhaust emissions during daily commutes.
Quick Guide to S-Presso Filter Selection
When shopping for replacement filters, your primary decision lies between Original Equipment Manufacturer (OEM) parts and reputable aftermarket alternatives. While OEM filters guarantee an exact fit and standard filtration performance, high-quality aftermarket options often provide a more budget-friendly choice or specialized features like enhanced odor filtration.
Products mentioned in this guide
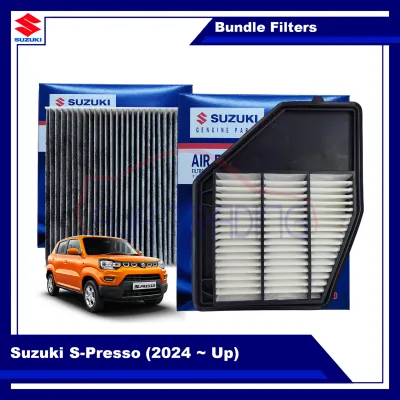
Prices are valid at publication and may change. Please refer to the product page for the latest price.
Before making a purchase, always prioritize matching the exact part numbers rather than relying on visual approximations. The Suzuki S-Presso utilizes a compact engine air filter housing and a dedicated cabin filter slot behind the glove compartment, both of which require precise dimensions to function effectively. Even a minor gap of a few millimeters can allow unfiltered air to bypass the media, compromising your engine’s health or reducing your air conditioning system’s efficiency.
For a basic do-it-yourself (DIY) replacement, you generally do not need specialized mechanical tools. A clean microfiber cloth, a vacuum cleaner for debris removal, and occasionally a small screwdriver to assist with stubborn plastic clips are typically all that is required to complete the job safely.
How to Identify the Correct Filter Specifications
To ensure you purchase the correct filters, start by consulting your Suzuki S-Presso owner’s manual. The manual contains a dedicated maintenance section listing the exact manufacturer part numbers, recommended dimensions, and replacement intervals for both the engine air filter and the cabin air filter.

If the manual is unavailable, you can inspect the existing filters currently installed in your vehicle. Carefully remove them and look for printed part numbers, brand markings, and airflow direction arrows stamped along the plastic or paper borders. Measuring the length, width, and height of the existing filters with a ruler can also provide a reliable reference point when comparing aftermarket options.
Another highly reliable method is to consult an authorized Suzuki dealer or use verified online automotive parts catalogs. By inputting your vehicle’s Vehicle Identification Number (VIN) or specifying the exact model year and variant, you can cross-reference part numbers to prevent compatibility errors.
When searching online marketplaces, using specific search terms such as “danzie store suzuki spresso” can lead you to dedicated sellers offering compatible aftermarket filters. Always verify the seller’s product descriptions, compatibility lists, and customer feedback to confirm that the parts are designed specifically for your vehicle’s model year before finalizing your order.
Comparing Filter Types and Materials
Understanding the differences between OEM and aftermarket filters helps you make a balanced decision based on your budget and driving conditions. OEM filters are designed by the vehicle manufacturer to meet strict factory standards, ensuring guaranteed fitment and maintaining your vehicle’s warranty compliance without any guesswork.
On the other hand, reputable aftermarket brands offer competitive pricing and alternative material choices. While aftermarket filters can provide excellent value, it is crucial to choose established brands that explicitly state compatibility with the Suzuki S-Presso to avoid poor sealing or inadequate filtration.
Engine Air Filter Materials
- Pleated Paper: This is the standard material used in OEM filters. It is highly cost-effective and provides excellent filtration of fine dust particles, making it ideal for daily driving. However, paper filters are strictly disposable and must be replaced once they become clogged.
- Reusable Cotton or Foam: Some aftermarket brands offer washable cotton or foam filters designed for long-term use. While they can offer slightly improved airflow, they require a meticulous cleaning and oiling procedure. Incorrect oiling can damage your engine's mass airflow sensor, so these require careful maintenance.
Cabin Air Filter Upgrades
- Standard Particulate Filters: These filters use a simple paper or synthetic fiber media to trap dust, pollen, and road debris. They are highly efficient at maintaining strong airflow through your air conditioning vents but do not neutralize odors.
- Activated Carbon Filters: These upgraded filters feature a layer of charcoal that actively absorbs exhaust fumes, smoke, and musty odors. While they significantly improve cabin air quality, they can sometimes slightly reduce maximum airflow due to their denser construction.
How to Replace the Engine Air Filter
Replacing the engine air filter on your Suzuki S-Presso is a straightforward process that helps maintain optimal fuel efficiency and engine health. Start by parking your vehicle on a flat surface, engaging the handbrake, turning off the engine, and allowing it to cool completely before opening the hood.
Locate the engine airbox, which is the black plastic housing positioned near the engine. Identify the fastening mechanism holding the airbox cover in place; the S-Presso typically uses metal tension clips or plastic tabs that can be easily released by hand.
Gently unclip the housing cover and lift it slightly to expose the old filter. Take note of how the filter is seated within the housing, paying close attention to which side faces upward.
Carefully lift the old filter out of the airbox, taking care not to drop any loose leaves, dirt, or debris into the open intake tract. Use a clean, damp microfiber cloth to wipe away any dust or grit from the inside of the airbox housing before installing the new filter.
Insert the new filter into the housing, ensuring that the rubber gasket around the edge seats perfectly flat without pinching or folding. A misaligned filter can allow unfiltered air to bypass the media, leading to internal engine wear over time.
Securely fasten the airbox cover clips. If you encounter any stripped fasteners, cracked plastic on the airbox housing, or disconnected electrical sensors, stop immediately and consult a qualified professional to prevent engine damage or diagnostic trouble codes.
How to Replace the Cabin Air Filter
The cabin air filter is responsible for cleaning the air that circulates through your vehicle’s air conditioning system. In the Suzuki S-Presso, this filter is conveniently located behind the glovebox assembly inside the cabin.
To access the filter housing, open the glovebox completely. Gently squeeze the outer sides of the glovebox inward to release the stop tabs from the dashboard frame, then lower the glovebox downward to remove it from its hinges.
Locate the rectangular cabin filter cover behind the glovebox opening. Release the plastic locking tabs on the cover and pull it straight off to reveal the filter element.
Before removing the old filter, observe the “Air Flow” indicator arrow printed on its side. It is critical to note whether the arrow points upward or downward, as the new filter must be installed with the same airflow orientation to function correctly.
Slide the old filter out of the slot and inspect the cavity for any dry leaves or dust. Insert the new cabin air filter, ensuring the airflow arrow matches the direction of the original filter.
Snap the filter cover back into place until you hear a distinct click. Reinstall the glovebox assembly by aligning the bottom hinges and snapping the side tabs back into the dashboard frame.
Finally, start your vehicle and turn on the air conditioning system. Test the airflow at various fan speeds to confirm that the air blows cleanly, quietly, and without any unusual whistling noises that might indicate an improper seal.
When to Inspect and Replace Your Filters
While manufacturers provide general mileage intervals for filter replacements, your actual driving environment plays a significant role in how quickly they clog. In the tropical climate of the Philippines, vehicles are frequently exposed to intense dust during the dry season and high humidity during the rainy season, both of which accelerate filter wear.
Conduct a visual inspection of your engine air filter every few months. Look for heavy accumulations of dark soot, trapped insects, physical tearing, or oil saturation. If the filter media appears dark gray or clogged with debris, it is time for a replacement.
Pay attention to performance signals from your vehicle. A clogged engine air filter can lead to sluggish acceleration, reduced fuel economy, or a rough engine idle. Conversely, a dirty cabin air filter often manifests as weak airflow from the AC vents, increased fan noise, or persistent musty odors inside the cabin.
If you regularly drive on unpaved roads, traverse dusty provincial routes, or commute through heavy urban traffic in Metro Manila, consider inspecting and replacing both filters more frequently than the standard service schedule suggests.
Frequently Asked Questions (FAQ)
Can I wash and reuse a standard paper engine air filter?
No, standard paper engine air filters are strictly designed for single-use applications and cannot be washed or reused. Attempting to clean a paper filter with water, liquid detergents, or high-pressure compressed air will permanently damage the delicate paper fibers. This degradation compromises the filter’s structural integrity and filtration efficiency, potentially allowing harmful abrasive particles to enter your engine and cause severe internal damage.
Will using an aftermarket filter void my Suzuki warranty?
Using a high-quality aftermarket filter generally does not void your vehicle’s warranty, provided the part meets or exceeds the original manufacturer specifications and is installed correctly. Under standard consumer protection principles, a manufacturer cannot deny a warranty claim simply because an aftermarket part was used, unless they can prove that the specific aftermarket filter directly caused the failure or damage in question. To protect yourself, always keep your purchase receipts and choose reputable aftermarket brands that guarantee compatibility with your Suzuki S-Presso.
Community discussion
Share your experience or ask a question. Comments are reviewed before publication.