
Replacing the engine air filter and cabin air filter on your Toyota Fortuner is one of the most straightforward maintenance tasks you can perform at home. In tropical climates like the Philippines, where vehicles frequently encounter heavy stop-and-go traffic, volcanic dust, and intense monsoon humidity, keeping these filters clean is essential for preserving engine health and ensuring clean cabin air. By handling this replacement yourself, you can complete the job in under 30 minutes, avoiding dealership labor markups while ensuring your SUV runs efficiently.
The engine air filter prevents airborne contaminants from entering the combustion chamber, while the cabin air filter purifies the air circulating through your air conditioning system. Over time, both filters become saturated with dust, pollen, and soot, which restricts airflow and degrades performance. Regularly inspecting and replacing these components ensures optimal fuel combustion and keeps your interior smelling fresh, even during the most humid months of the year.
Tools and Parts Preparation
Before starting, gather the necessary tools and verify that you have the correct replacement parts. Fortunately, the Toyota Fortuner is designed with user-friendly maintenance in mind, meaning you will not need specialized garage equipment.
Products mentioned in this guide
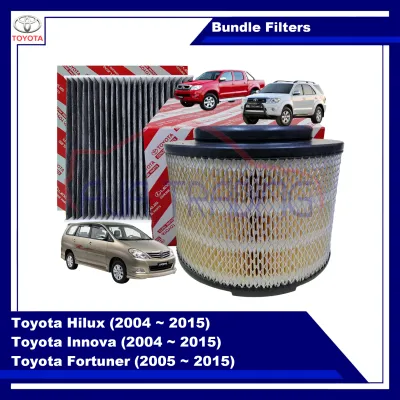




Prices are valid at publication and may change. Please refer to the product page for the latest price.
For most model years, you only need a few basic hand tools. A standard flathead and Phillips screwdriver, a basic socket set, and a plastic trim removal tool are highly recommended. The trim tool is particularly useful for gently releasing plastic clips without scratching the interior dashboard panels. Always consult your vehicle’s owner’s manual to confirm the exact fastener sizes and locations for your specific model year, as minor design variations exist across different generations of the Fortuner.
To ensure a seamless installation, verify that your replacement fortuner filter set is fully compatible with your vehicle’s model year, engine type, and trim level. The most reliable way to confirm compatibility is by checking your vehicle identification number (VIN) or cross-referencing the part numbers listed in your owner’s manual. Purchasing an incorrect size can lead to air bypass, which allows unfiltered air to damage your engine or pollute your cabin.
Finally, prepare your workspace. Park your Fortuner on a flat, level surface, engage the parking brake, and turn off the engine completely. Allow the engine bay to cool down for at least 30 minutes to avoid accidental burns from hot engine components. Ensure you are working in a well-ventilated, well-lit area, such as an open garage or driveway, so you can clearly inspect the filter housings and surrounding seals.
Replacing the Engine Air Filter
The engine air filter housing is located on the passenger side of the engine bay, positioned near the battery and the front fender. This black plastic box shields the filter element from engine heat and moisture while channeling clean air directly into the intake manifold.

To begin, locate the metal clips or plastic tabs securing the air filter housing cover. On most Fortuner models, you will find two to four heavy-duty metal spring clips. Carefully unclip these fasteners by pressing them outward. If your specific model year utilizes screws or bolts alongside the clips, use your socket wrench or screwdriver to loosen them. Gently lift the housing cover just enough to access the filter inside. Avoid pulling too hard on the cover, as it is connected to the mass airflow (MAF) sensor wiring harness and the rubber intake duct; excessive force can strain these electrical connections or loosen the intake hose clamps.
With the cover lifted, slide the old engine air filter out of the housing. Take a moment to inspect the dirty filter, noting which side faces upward. The clean side of the filter should face the engine intake, while the dirty side faces the incoming air duct. Before inserting the new filter, use a clean, damp microfiber cloth to wipe out any accumulated dust, leaves, or insects from the bottom of the filter housing. Be careful not to push any debris down into the clean side of the intake tube.
Next, prepare the new filter from your fortuner filter set. Align the filter with the housing, ensuring that the rubber sealing lip around the perimeter of the filter sits perfectly flush within the housing grooves. A misaligned filter will prevent the housing cover from closing properly and allow unfiltered air to bypass the filtration media, potentially damaging internal engine components over time.
Once the filter is seated correctly, lower the housing cover back into position. Re-engage the metal clips, ensuring they snap tightly into place, or tighten any screws to the manufacturer’s recommended torque.
If you notice that any of the plastic housing clips are broken, if the rubber intake tube shows signs of dry rot or severe cracking, or if the filter does not seat flush despite multiple attempts, stop the process immediately. Operating the vehicle with a compromised intake system can lead to severe engine damage. Consult a qualified mechanic or visit an authorized service center to replace damaged housing components before driving.
Replacing the Cabin Air Filter
The cabin air filter is responsible for trapping dust, pollen, and exhaust soot before the air enters your vehicle’s ventilation system. In the Toyota Fortuner, this filter is conveniently located behind the glove compartment, making it easily accessible without requiring any disassembly of the main dashboard.
To access the cabin filter, open the glove compartment fully and empty its contents. Locate the dampener arm on the outer right side of the glove box. This arm controls the smooth opening and closing of the compartment. Gently slide the dampener arm off its mounting pin; you may need to squeeze the plastic connector slightly to release it. Next, locate the plastic stoppers on the left and right interior walls of the glove box. Gently press the sides of the glove box inward to release these stoppers from the dashboard frame. Once cleared, lower the glove compartment door downward and lift it off its bottom hinges, setting it aside in a safe place.
With the glove box removed, you will see a rectangular plastic cover labeled “Filter” or featuring airflow direction markings. Squeeze the locking tabs on the sides of this cover to release it, then pull the cover straight off. Slide the old cabin air filter out of its slot.
As you remove the old filter, pay close attention to the airflow direction arrow printed on its side. In the Fortuner, the cabin air flows from top to bottom, meaning the arrow on your new filter must point downward. Before sliding the new filter in, use a dry microfiber cloth or a small vacuum attachment to clean out any dust or debris that has accumulated inside the filter slot.
Slide the new cabin air filter into the slot, ensuring the “Air Flow” arrow points downward. Replace the plastic filter cover, pressing it until you hear the tabs click securely into place. Reinstall the glove compartment by aligning the bottom hinges, swinging the box upward past the stoppers, and snapping the dampener arm back onto its pin.
If you notice a persistent musty or sour odor coming from your air conditioning vents even after installing a brand-new cabin filter, the issue may lie deeper within the system. High humidity levels can lead to mold or bacterial growth on the AC evaporator core. In such cases, the evaporator core may require a professional chemical cleaning or disinfection service to fully restore interior air quality.
Post-Installation Checks and Maintenance Planning
After successfully installing both filters, perform a few quick checks to verify that everything is sealed and operating correctly.
Start your Fortuner’s engine and let it idle. Open the hood and listen closely near the engine air filter housing. You should not hear any unusual whistling, hissing, or deep suction noises, which typically indicate an air leak caused by an improperly seated filter or an unlatched housing cover. Next, sit inside the cabin and turn on the air conditioning system. Cycle through the different fan speeds and vent modes. The airflow should feel strong, consistent, and unobstructed across all vents, and there should be no rattling noises coming from behind the glove compartment.
To maintain optimal performance, establish a condition-based maintenance routine. While standard service schedules often recommend replacing these filters every 10,000 to 15,000 kilometers, local driving conditions play a massive role. If you frequently drive through dusty rural roads, unpaved construction zones, or heavy urban traffic in highly polluted areas, you may need to inspect and replace your filters much sooner—sometimes as early as every 5,000 kilometers.
Develop the habit of visually inspecting both filters during your regular oil changes. Pull the filters out and inspect the pleats. If the filter media appears dark gray, clogged with debris, or shows signs of physical tearing or moisture damage, replace it immediately. Investing in a high-quality fortuner filter set and keeping a proactive eye on its condition will safeguard your engine’s longevity and keep your cabin air clean and breathable.
Frequently Asked Questions (FAQ)
Can I use any universal filter if I cannot find a specific Fortuner filter set?
No, you should avoid using universal or non-specific filters for your Toyota Fortuner. Filters must match the exact dimensions, thickness, and sealing design specified by the original equipment manufacturer (OEM). A filter that is even slightly too small or too large will fail to create an airtight seal within the housing. This allows bypass air—unfiltered air containing abrasive dust and debris—to enter your engine or air conditioning system, leading to premature engine wear or clogged AC components. Always purchase a verified fortuner filter set designed specifically for your model year.
What happens if I install the cabin air filter backward?
Installing the cabin air filter backward restricts the overall airflow and reduces the efficiency of your vehicle’s air conditioning system. Cabin filters are designed with a specific structural gradient; the media is denser on one side to capture progressively smaller particles as air passes through. If installed in reverse, the filter will clog much faster, place unnecessary strain on the blower motor, and potentially cause the AC system to work harder to cool the cabin, leading to increased wear on electrical components. Always ensure the printed airflow arrow points downward.
Do I need to reset any computer sensors after changing these filters?
For standard Toyota Fortuner models, replacing the physical engine and cabin air filters does not require any electronic control unit (ECU) resets or sensor recalibrations. The mass airflow (MAF) sensor will automatically adjust to the improved, clean airflow. However, some newer or higher-trim models may feature a customizable maintenance reminder menu on the multi-information display (MID) in the instrument cluster. If your dashboard displays a scheduled maintenance reminder, you can easily clear or reset this notification manually through the steering wheel controls and settings menu.

Community discussion
Share your experience or ask a question. Comments are reviewed before publication.